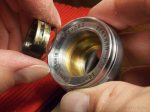
This Canon Serenar 35mm f/3.5 is in nice condition, but the aperture ring is a little stiff. Plus, I’ve already cleaned the other two so I might as well do the entire set.
I thought this one, being the smallest, would be the easiest. It wasn’t. I had a difficult time reassembling the rear section. For some reason the black painted plate was locking up the helicoid. I eventually got it and the lens works like new. The aperture is now fantastically smooth, partly because it is click-less from the factory.
You can read more about its history in another post.
The Canon Serenar 35mm f/3.5 is a tiny lens, but still full frame.
Start by removing the four screws around the M39 screw mount.
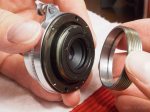
Remove the ring.
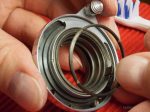
This lens has an odd double nested helicoid. One of the two sets of threads is redundant. The lens fully operates without the outer ring, you just can’t mount it on a camera.
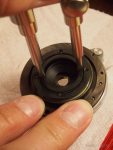
Use a spanner tool to remove the black spanner nut. Be careful of the 65 year old paint.
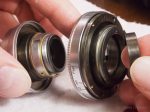
With the spanner nut removed the two sections separate.
The black pin aligns with the slot on the front lens section. This picture will help in reassembly.
Notice the crimps on the aluminum. They have to be pushed out to allow the small spanner nut to unscrew.
With the crimps pushed out the spanner nut can be removed with the spanner tool.
The spanner nut is loose, but trapped.
This piece won’t slide out either.
Unscrew the knurled ring to free the previous parts. You can see where I pushed the crimped aluminum out.
Unscrew these two screws to remove the arm.
Now the spanner nut is free.
Now this part is free.
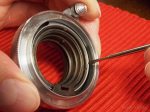
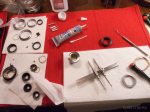
Here’s a nice layout of the parts in this section.
The stop screws in the piece don’t need to be removed. They aren’t in the way of anything.
Remove the four painted screws on the other side. Be careful once again with the 65 year old paint. They have a bit of thread locker so they don’t come out so easily. Be sure to apply great pressure on the head while turning with force. You’ll have to either hold the piece carefully or set it on something to support it because the metal ring beneath it is thin and can be bent from pushing on it too hard.
Even with the four screws removed it is difficult to slide out. Carefully pry it loose by moving a thin tool around the edge. The paint is likely to be scratched in this step.
A gap is formed after prying around the piece.
Finally it’s free. Note how the two tabs line up with the plate.
These two pieces will now unscrew.
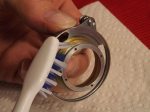
Acetone cleans the old grease nicely.
Use a toothbrush dipped in acetone to get the grease out of the threads.
Remove the brass washer from the front lens assembly.
This screw connects to the aperture ring.
Remove the aperture pin. During reassembly be sure the head clears the surrounding parts. On this lens it was sticking out just a little too far and was sticking.
These two screws need to come out.
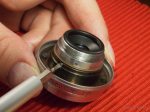
Looking at the front of the lens, carefully remove the plastic ring with a spanner tool. Any marks you make here will be seen forever.
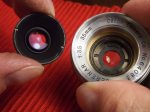
The front element is removed.
Use the spanner tool to remove the next lens element.
Removing this element reveals the aperture blades. There are six small blades on this lens.
Use the spanner tool to remove the spanner nut and the aperture housing and washer come out.
There are two thin split washers sitting in a groove. Carefully find the gap in the washer and slide it out of the groove.
You can see the gap in the split washer. Slide it off.
When you remove the threaded outer ring and then the inner helicoid, is there a specific way the lens has to be set(i.e. lens focus distance) to re-thread the inner helicoid back on? I was curious if doing it incorrectly would result in the focus being off.
It doesn’t matter how you mount the outer helicoid. It simply screws on around the lens section and is redundant. Also, it’s all thread, so there is no way to adjust the way it mounts.
Cool, thanks. Lastly, if there is a small scratch on the black paint where you would use a spanner wrench is that going to need to be repainted, or is probably fine?
Painting that black part would mostly be for cosmetic reasons. It’s unlikely to have an effect on the optical performance of the lens because it’s 180 degrees from the source of light.
This is a fantastic teardown. I used this today to get to a bad breakout of fungus right by the rear lens, next to the iris blades. The fungus was cleaned up, but the damage to the optical coating is beyond repair. On the plus side, I learned quite a bit in disassembling and reassembling these lenses. Thanks for putting this together
It’s awesome that you were able to dig into your lens and fight off the fungus. It can be pretty harsh on the coatings, but perhaps that adds more character?
At the time I was using white lithium grease. It’s not a bad option, but I wish I could get my hands on something more intended for photography. It would be nice to have some lubricant that is slightly thicker. I have some lenses that are too easy to turn and even white lithium isn’t thick enough.
thanks, I will go and get something off ebay, I have this lens just sitting, got it for $5 at the flea market, it needs CLA and should be good to go.I will follow your instructions as guide THANKS A LOT for the step by step disassembly and cleanup
Thanks. I’ve used various chemicals such as alcohol and even acetone. Anything you use on your glass is at your own risk since you don’t know what effect it will have. The coatings could be removed without you even realizing it.
Hi mark I got into the canon 35 3.5 I jut got and thought it was a different lens. The second set of threads
Was not there. I did mount it on a lumix g1 to test after cleaning the lens elements I could hardly focus it
The haze and fungus was so bad, it cleaned up wonderfully. It will not focus to infinity not sure where I made then mistake. I did not do all the steps only the front inner and rear elements. I may have missed the black pin to align the front lens you referred to. I’m surprised how sharp this 70 year old lens is wide open at 3.5 feet
Closest I could get. Thanks for the site I will work on to getting the paint chips out of 85mm f2 at first I thought it was the iris blades. Thanks again d benedict
Glad my article was helpful. I suppose there could be different versions of this lens. That would explain why yours didn’t have a second set of threads.
Hi mark, I have learned a lot, apparently someone had worked on both the 35 3.5 and the canon 85 f2
That came with a canon canon iib the 50 mm was fine.
On the 35 3.5 i could not use my marks when dissassembling it because it was wrong to begin with. After hours of craziness I got it back together focusing on infinity and everything fell into place it cleaned up nicely
And may be sharper then my 3.5cm.
The same with the 85 mm f 2 it was all screwed up.i had to clean helicoid 3 times, it is is fine when clean but as soon as I added the Japan hobby lube it was to tight and I just used a minute amount.
The lens is together correctly now clean glass and focusing correctly, but focusing moves the aperture ring and the aperture ring will move the focus ring. The aperture ring is loose if I tighten it it’s worse
There is no grease on the helicoid now,this was a test to see everything is in place, it is I’m wondering if I got the focusring screws mixed up and no grease somehow is the culprit. Any ideas.
Thanks again for a great learning challenge, now it’s done. Dave benedict
Thanks for posting this, It was quite helpful while doing a CLA on my lens. Thank You!! Thank You!!
Just an FYI…that second helical on the rear of the lens is the rangefinder cam, its there for the rangefinder arm/follower in the original film camera to press against. It needs to be in the correct position (indexed correctly) for it to move in and out as you focus the lens. On a digital camera I suppose this may not be important. On a Leica or a Leica clone ( Canon, Leotax, Nicca, Fed, Zorki, Etc.) rangefinder type camera, it’s quite critical.
I’m glad you found this helpful. It’s good to know what the helical on the back is for. I shoot with modern cameras, but do have the original Canon camera these lenses were made for.


When you remove the threaded outer ring and then the inner helicoid, is there a specific way the lens has to be set(i.e. lens focus distance) to re-thread the inner helicoid back on? I was curious if doing it incorrectly would result in the focus being off.
LikeLike
It doesn’t matter how you mount the outer helicoid. It simply screws on around the lens section and is redundant. Also, it’s all thread, so there is no way to adjust the way it mounts.
LikeLike
Cool, thanks. Lastly, if there is a small scratch on the black paint where you would use a spanner wrench is that going to need to be repainted, or is probably fine?
LikeLike
Painting that black part would mostly be for cosmetic reasons. It’s unlikely to have an effect on the optical performance of the lens because it’s 180 degrees from the source of light.
LikeLike
Great site, thank you!
LikeLike
This is a fantastic teardown. I used this today to get to a bad breakout of fungus right by the rear lens, next to the iris blades. The fungus was cleaned up, but the damage to the optical coating is beyond repair. On the plus side, I learned quite a bit in disassembling and reassembling these lenses. Thanks for putting this together
LikeLiked by 1 person
It’s awesome that you were able to dig into your lens and fight off the fungus. It can be pretty harsh on the coatings, but perhaps that adds more character?
LikeLike
What helicoid lub did you use on this? Any recommendation of lub on the canon 50mm f0.95 lens?
Thanks
Ron
LikeLike
At the time I was using white lithium grease. It’s not a bad option, but I wish I could get my hands on something more intended for photography. It would be nice to have some lubricant that is slightly thicker. I have some lenses that are too easy to turn and even white lithium isn’t thick enough.
LikeLike
thanks, I will go and get something off ebay, I have this lens just sitting, got it for $5 at the flea market, it needs CLA and should be good to go.I will follow your instructions as guide THANKS A LOT for the step by step disassembly and cleanup
LikeLiked by 1 person
Awesome guide, thanks for taking the time to create this. What did you use to clean the glass elements?
LikeLike
Thanks. I’ve used various chemicals such as alcohol and even acetone. Anything you use on your glass is at your own risk since you don’t know what effect it will have. The coatings could be removed without you even realizing it.
LikeLike
Hi mark I got into the canon 35 3.5 I jut got and thought it was a different lens. The second set of threads
Was not there. I did mount it on a lumix g1 to test after cleaning the lens elements I could hardly focus it
The haze and fungus was so bad, it cleaned up wonderfully. It will not focus to infinity not sure where I made then mistake. I did not do all the steps only the front inner and rear elements. I may have missed the black pin to align the front lens you referred to. I’m surprised how sharp this 70 year old lens is wide open at 3.5 feet
Closest I could get. Thanks for the site I will work on to getting the paint chips out of 85mm f2 at first I thought it was the iris blades. Thanks again d benedict
LikeLike
Glad my article was helpful. I suppose there could be different versions of this lens. That would explain why yours didn’t have a second set of threads.
LikeLike
Hi mark, I have learned a lot, apparently someone had worked on both the 35 3.5 and the canon 85 f2
That came with a canon canon iib the 50 mm was fine.
On the 35 3.5 i could not use my marks when dissassembling it because it was wrong to begin with. After hours of craziness I got it back together focusing on infinity and everything fell into place it cleaned up nicely
And may be sharper then my 3.5cm.
The same with the 85 mm f 2 it was all screwed up.i had to clean helicoid 3 times, it is is fine when clean but as soon as I added the Japan hobby lube it was to tight and I just used a minute amount.
The lens is together correctly now clean glass and focusing correctly, but focusing moves the aperture ring and the aperture ring will move the focus ring. The aperture ring is loose if I tighten it it’s worse
There is no grease on the helicoid now,this was a test to see everything is in place, it is I’m wondering if I got the focusring screws mixed up and no grease somehow is the culprit. Any ideas.
Thanks again for a great learning challenge, now it’s done. Dave benedict
LikeLike
Hi,
Thanks for posting this, It was quite helpful while doing a CLA on my lens. Thank You!! Thank You!!
Just an FYI…that second helical on the rear of the lens is the rangefinder cam, its there for the rangefinder arm/follower in the original film camera to press against. It needs to be in the correct position (indexed correctly) for it to move in and out as you focus the lens. On a digital camera I suppose this may not be important. On a Leica or a Leica clone ( Canon, Leotax, Nicca, Fed, Zorki, Etc.) rangefinder type camera, it’s quite critical.
I use mine on both and love it… 🙂
LikeLike
I’m glad you found this helpful. It’s good to know what the helical on the back is for. I shoot with modern cameras, but do have the original Canon camera these lenses were made for.
LikeLike